Although we are literally years away from renovating our basement and adding a laundry area, I am still on the lookout for eye-catching ideas.
This one is in a showhome in the Tower Ranch subdivision in Kelowna, BC. It is probably one of the first dedicated, chic-style laundry rooms I noticed - before I started seeing them everywhere in magazines. (I wasn't even thinking of blogging at the time I took these pictures, so please excuse the slightly awkward angle.)
And the sink area...
A few weeks ago, I was watching an episode of Home to Flip, which included the laundry area of Peter Fallico's current project. I am so, so jealous of such a bright space in a basement, and all that storage... wow!
This one is so bright and airy! (But I have to say, if I had a room like that I'd be more inclined to try and use it as a sitting room/porch-type area!)
Wow, looks like I'm all about white cabinets and light blue walls, hey? Ok, how about this one from Hampton Design for a bit of variety... No blue! (I seriously do not have any saved laundry room pictures that do not feature white cabinetry! I guess that'll be a given when we finally get to our laundry area.)
Will you share your favourite laundry area? I need inspiration - especially if it's not white and blue!
Monday, May 31, 2010
Wednesday, May 26, 2010
Wishlist Wednesday
This week, I've got something totally indulgent on my list. Delphine has gorgeous, customizable stationary. I am torn between the Chrysanthemum personal note card...
...and the slightly more businesslike Kent personal note card.
There are tons of designs and color combination, and even matching envelopes! Beautiful! What's your favourite?
...and the slightly more businesslike Kent personal note card.
There are tons of designs and color combination, and even matching envelopes! Beautiful! What's your favourite?
Thursday, May 20, 2010
Mock-Up: Gray Living Room
When I discovered Polyvore, the first "set" I did was this gray living room. As I mentioned, it includes the Nate Berkus Hexagonal Cocktail Ottoman from yesterday's Wishlist post. You may also recognize the Troy Lighting Sausalito Pendant from my first Wishlist post.
When I look at this set now, I am torn between thinking it needs some color and loving the totally neutral palette. What do you think?
When I look at this set now, I am torn between thinking it needs some color and loving the totally neutral palette. What do you think?
Wednesday, May 19, 2010
Wishlist Wednesday
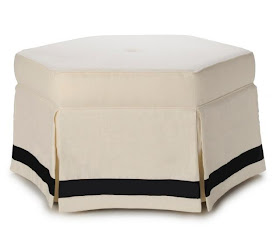
I am a big fan of the versatile ottoman, especially in a living room. This one from Nate Berkus (via HSN) is simple and classy. The hexagonal shape adds interest to an otherwise straight-forward piece.
I think a pair would be perfect in a living room. Tomorrow I'll share a mock-up of a gray living room that incorporates these ottomans.
I think a pair would be perfect in a living room. Tomorrow I'll share a mock-up of a gray living room that incorporates these ottomans.
Sunday, May 16, 2010
Peanut Butter Munchies
I found this recipe in Better Homes and Gardens' 100 Best Cookies magazine a few years ago. These are now on my Christmas Baking list every year. They are a bit of work, but totally worth it! They are fantastic when they're just out of the oven, but stay very nice in the freezer too.
Peanut Butter Munchies
1 cup less 1 Tbsp sifted powdered sugar
3/4 cup peanut butter
1-1/2 cups all-purpose flour
1/2 cup unsweetened cocoa powder
1/2 teaspoon baking soda
1/2 cup butter, softened
1/2 cup granulated sugar
1/2 cup packed brown sugar
1/4 cup peanut butter
1 egg
1 tablespoon milk
1 teaspoon vanilla
2 tablespoons granulated sugar
1. For peanut butter filling, in a medium mixing bowl combine powdered sugar and the 3/4 cup peanut butter until smooth. Refrigerate for about 1 hour (while you make the chocolate cookie part, steps 2 and 3 below). Shape mixture into 32 (3/4-inch) balls.
2. Preheat oven to 350 degree F. In a medium mixing bowl stir together flour, cocoa powder, and baking soda; set aside.
3. In a large mixing bowl beat together butter, the 1/2 cup granulated sugar, brown sugar, and the 1/4 cup peanut butter with an electric mixer until combined. Add egg, milk, and vanilla; beat well. Beat in as much of the dry ingredients as you can with mixer. Stir in remaining dry ingredients by hand with a wooden spoon. Form chocolate dough into 32 balls about 1-1/4 inches in diameter.
4. On a work surface, slightly flatten a chocolate dough ball and top with a peanut butter ball. Shape the chocolate dough over the peanut butter filling, completely covering the filling. Roll dough into a ball. Repeat with the remaining chocolate dough and peanut butter filling balls.
5. Place balls 2 inches apart on an ungreased cookie sheet. Lightly flatten with the palm of your hand. Sprinkle the 2 tablespoons granulated sugar over the cookies.
6. Bake cookies in preheated oven for 7-8 minutes or until they're just set and surface is slightly cracked. Let cookies stand for 1 minute. Transfer cookies to wire racks; cool. Makes 32 cookies.
To Store: Place in layers separated by waxed paper in an airtight container; cover. Store at room temperature for up to 3 days or freeze for up to 3 months.
YUM!
Wednesday, May 12, 2010
Wishlist Wednesday
I am getting more and more hooked on "dressy" aprons, or hostess aprons - the ones that don't make you look like you're wearing a bad pair of overalls, and do make you look more like a domestic goddess!
The first dressy apron I purchased was from City Girl Aprons, via Etsy. I chose the adorable Damask Apron, which is usually in stock.
This one from Boojiboo via Etsy...
...and this one from Anthropologie are both on my wishlist.
What do you think? Do any of these catch your eye or do you have another favourite from somewhere else?
This weekend I will share one of my favourite recipes to go with the apron!
Sunday, May 9, 2010
Weekend Getaway - Salt Spring Island
This past week Kevin and I celebrated our fourth anniversary. We took a few days off work and headed over to Salt Spring Island, just a short ferry ride away. We stayed in a "vacation rental by owner" condo and it was great!
Beautiful view from the covered deck.
I loved this little vignette in the bedroom.
We spent a few days driving and walking around, just relaxing and checking out the gorgeous scenery...
...the locals (hehe)...
Beautiful view from the covered deck.
I loved this little vignette in the bedroom.
We spent a few days driving and walking around, just relaxing and checking out the gorgeous scenery...
...the locals (hehe)...
...and the Saturday Market. We had wonderful weather and it was such a relaxing few days. Hard to believe we've never been there before, but we would definitely go again!
Wednesday, May 5, 2010
Wishlist Wednesday
I would love to upgrade my current "coffee table" - actually a brown ottoman from Wal-Mart - to something much more glamorous. I think this gorgeous mirrored coffee table from The Cross would be perfect.
It is featured in my most favourite living room, looking very icy and cool.
A similar one also makes an appearance on the cover of the current issue of House Beautiful. This room makes the table look much warmer to me, maybe because it's sort of snuggled up with the ottoman.
...just as beautiful up close!
Would this table (or something else from these rooms) be on your wishlist?


